
What’s the best way to introduce the letter sound o in kindergarten?
I have four easy, engaging, and most importantly – effective steps to share with you.
The demands on teachers these days are a little nuts if you ask me. There’s always so much to do and plan, and the pressure to show academic growth, even in kindergarten, can feel like a lot.
One thing I no longer stress about is teaching kids letter sounds. I’ve found a simple and effective practice that works for my students and is also pretty fun.
If you teach preschool or kindergarten students and are wondering if there’s a “best way” to introduce a new letter sound, I hope I can share a little inspiration.
Many programs will have you say something like:
“This is the letter o (showing the printed letter). O says /ŏ/, as in octopus (showing a picture of an octopus below the letter). Repeat after me, O, octopus, /ŏ/”.
That’s one way to do it. I did this for many years and my students eventually got the hang of it.
However, after much time spent reading research studies and professional books, as well as attending countless trainings in structured literacy, I’ve made a few simple changes to my routine and have seen wonderful results in how quickly my students master letter sounds.
Routine for Introducing the Letter O and Its Short Sound
You can watch this video to get an idea of the entire routine. Or, just hit play and show it to your students as an introduction to the short o sound.
Start with speech.
Why?
Since our brains are naturally wired for oral (rather than printed) language, beginning with sounds as opposed to letters gives our students a natural starting point for learning to read and write. It’s also more fun for kids.

How?
Say 3-6 words that begin with the letter o sound, such as otter, omelet, ostrich, ox, opposites, and octopus. Ask children to repeat each word after you say it. Showing an image of each word helps add interest and can be especially helpful for students with limited English vocabulary and kids who struggle with attention. Tell students that all of these words begin with the sound /ŏ/. Really stretch out the sound, and if you have it in you – sing it like an opera star! That’s always good for a laugh, or at least capturing the attention of five-year-olds!
Draw attention to what your mouth does when you make the /ŏ/ (short o) sound.
Why?
Simply put, drawing our kids’ attention to how our mouths look and feel while producing the sound helps make an abstract concept more concrete. This adds an additional multisensory component to our approach, which is beneficial for many of our students.
How?
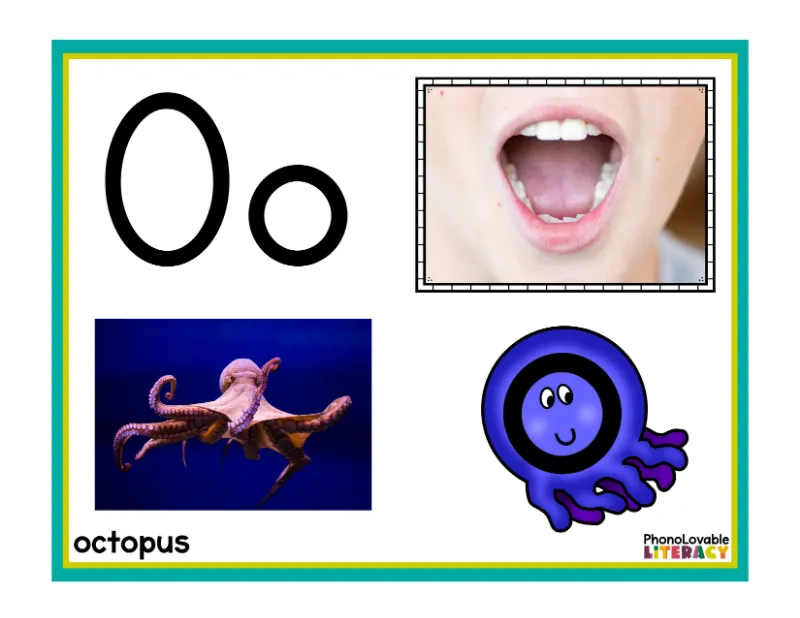
Ask students to notice what their mouth is doing to make the sound /ŏ/. If you are in small group, hold up a small mirror to let students look at their own mouths. Draw attention to the fact that our chin drops and our mouth opens. Here’s where visuals come in handy again. Display a “mouth pic”/sound articulation card for students to observe.
Introduce the printed letter with an EMBEDDED mnemonic.
Why?
Research going back decades revealed that using embedded images, keyword pictures displayed within the letter as opposed to showing a picture separate from the letter (beside, above, or below), resulted in students improving both the acquisition AND retention of letter-sound correspondences. In fact, it was more effective and efficient. Using pictures, especially ones of relatable objects, to help kids associate letter-sound relationships makes sense. But it was great to read several research studies to confirm this!
How?
Here is where you’ll first show your students the actual letter. But not just a plain letter, an embedded letter. The image of a keyword such as octopus embedded in the letter helps solidify the connection between letter and sound. The shape of the octopus, corresponding to the shape of the lowercase letter o, will serve as a reminder of the phoneme-grapheme correspondence.
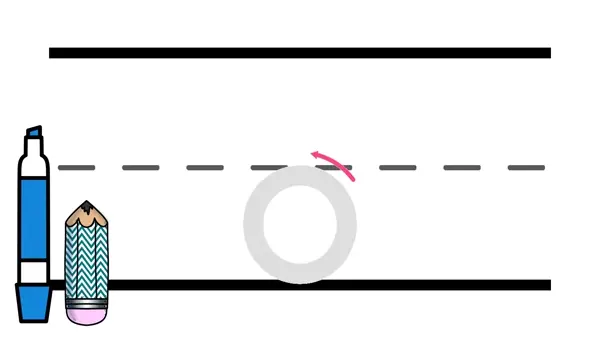
Model and practice how to write the letter.
Why?
Reading and writing are interconnected. We teach letter sounds so that students may not only decode new words but learn to write them as well. As an interventionist who works with students from kindergarten to 4th grade, I see how hard it is to undo inefficient letter formation habits. For the past few years, I’ve made it a point to prioritize letter formation as early as possible.
How?
This letter is pretty easy for most students, but I still prefer to keep my letter formation language simple. You may have different wording from a program you’ve used, or you may wish to change up how you say this, but here’s what I say as I model how to write the lowercase letter o.
“Touch the middle line as you curve all the way around.” I model with my hand in the air and/or show an animated slide on my computer (in small group) or smart TV (in whole group). Ask students to try to follow along with their fingers in the air. If children are seated at desks, I ask them to finger-write it on the desk.
If you are tutoring or have one-on-one instruction, you can also do this in a tray of sand or (less messy) beads. Shaving cream is also an option if you have a thick towel nearby to clean up the mess! None of those options are necessary though. Sky or desk writing is just as effective!
After a few finger-writing attempts, I have my students practice with pencils on paper or dry-erase markers on whiteboards. I keep a close watch as they write, giving guidance, encouragement, and corrective feedback as needed.
Research-Aligned Alphabet Resources
If you need easy-to-use resources to implement the steps above, here are my recommendations:
Initial Sound Slides: These no-prep slides introduce each letter sound in the most effective and efficient way. Start with images of interesting photographs containing the beginning sound. Show a photo of a real kid making the sound along with a keyword image. Show the letter with an embedded mnemonic image. Then show the animated letter formation (in uppercase and lowercase plain letters).
Mnemonic Alphabet Articulation Mouth Cards | Alphabet Posters with Real Pictures: These are printable, 1-page posters to show if you prefer a paper option or don’t have access to digital resources. It’s also a nice way to display the alphabet if you have classroom wall space.
Alphabet Picture Cards with Embedded Mnemonics: This set of printable pages comes with embedded letter cards in two sizes. Teach phonemes for 21 consonants, 5 short vowels, AND consonant digraphs WH, TH, SH, CH, and CK.
Get a free set of small embedded letter cards when you join us in our newsletter community!
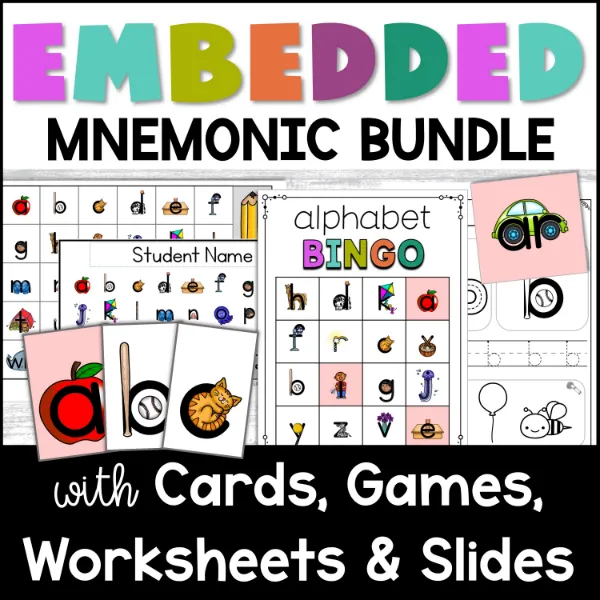
Looking for an “everything bundle” of embedded letter resources, including digital slides, letter cards, worksheets, games, and more? Save nearly 50% and get all 12 resources. Get your students quickly and effectively mastering letter sounds so they can begin the even more exciting discovery of how to read and write words!
Sources:
Ehri, L. C., Deffner, N. D., & Wilce, L. S. (1984). Pictorial mnemonics for phonics. Journal of Educational Psychology, 76(5), 880–893. https://doi.org/10.1037/0022-0663.76.5.880
Ehri, L. C. (2013). Orthographic Mapping in the Acquisition of Sight Word Reading, Spelling Memory, and Vocabulary Learning. Scientific Studies of Reading, 18(1), 5–21. https://doi.org/10.1080/10888438.2013.819356
Ehri, L.C. (2022). What Teachers Need to Know and Do to Teach Letter–Sounds, Phonemic Awareness, Word Reading, and Phonics. The Reading Teacher, 76(1), 53-61. https://doi.org/10.1002/trtr.2095
McNamara, G. (2012). The effectiveness of embedded picture mnemonic alphabet cards on letter recognition and letter sound knowledge. Theses and Dissertations. 302. https://rdw.rowan.edu/etd/302
Shmidman, A., & Ehri, L. (2010). Embedded Picture Mnemonics to Learn Letters. Scientific Studies of Reading, 14(2), 159–182. https://doi.org/10.1080/10888430903117492